Thursday, 27 September 2012

What is a thriller?

A thriller is expressed as a novel, play or movie with an exciting plot that uses suspense, tension and excitement as main elements within the composure. A thriller is close to what you could call a puzzle of the mind. Thrillers aren't simple films which you understand as soon as you start watching them, they're something that takes a while to understand but once you do it changes the whole picture. Thrillers never set the scene, they're always fast moving so you can never quite gather the plot of the story at the beginning  This helps the film to encourage the audience to watch it for longer, as they will be intrigued to see what is going to happen.


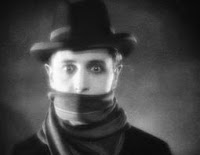
The main reason for a thriller is to nerve people, make them feel on edge. Different techniques help to make a film more scary such as the use of sound and the way the camera is portrayed. You could have a silent thriller and this could build up more tension that it could if it had sound. Thrillers have been used as a genre since the 20's. Alfred Hitchcock decided that he would try silent films and this is when he explored the idea of his films 'The Lodger' and 'Blackmail'. 

Over the years different technology has been invented, making thrillers very different today. Technology has enabled them to be able to use special effects such as 3D making them a lot more tense. This helps with putting the audience on edge and making them feel permanently nervous.  

Some examples on thrillers are:


Wednesday, 26 September 2012

Coursework task defined


Preliminary exercise: Continuity task involving filming and editing a character opening a door, crossing a room and sitting down in a chair opposite another character, with whom she/he then exchanges a couple of lines of dialogue. This task should demonstrate match on action, shot/reverse shot and the 180-degree rule.
Main task: the titles and opening of a new fiction film, to last a maximum of two minutes.
All video and audio material must be original, produced by the candidate(s), with the exception of music or audio effects from a copyright-free source. Both preliminary and main tasks may be done individually or as a group. Maximum four members to a group.

Tuesday, 25 September 2012

Signifiers & Semiotics

Semiotics is the study of SIGNS.

The Signifier - the sign: a word, colour, or image. For example 'the colour blue'.


The Singnified - the concept/meaning/associations that the sign refers to.


For example: Rose - Signifier: red rose with a green stem
                    Signified: symbol of passion & love is what                                     the rose represents.


In the Prelim we did, we used signifiers. We set the scene of cowboys in a bar drinking. You could tell this because we used cowboy hats which are sterotypical for a cowboy which was the signifier and it signified that they were cowboys sat in a bar. We also used the signifier shot glasses which signified that they were drinking as that is what they are used for.


Monday, 24 September 2012

Edited Prelim

This is the finished prelim that we have edited and filmed by ourselves  This was the first time I have ever put something like this together. Even though I know when I look back on it, it probably won't look very good, at the moment I am very happy with it. It is available to watch on youtube and the group and I are very happy how it turned out.


Sunday, 23 September 2012

Editing - Prelim


To make the prelim even more fun we edited them. We had them on the computer which were iMacs as that’s the best hardrive to edit from. We used the software Final Cut Pro. Our prelims were already on the computers we just had to find them.

We split our group of 5 into a 2 and 3. I worked in the group of two and this meant that we could focus closely on what needed work and what would make the prelim look better. We looked through all of the different shots and decided which ones were best and which ones were necessary to have in the final prelim. We didn't want to delete anything but we put all of the clips that we wanted to include into a file and the ones which we didn't want into another. The two files were called ‘Log bin’ which was where we put the clips that we wanted and then the ‘Rush bin’ for the ones that weren't needed throughout our prelim.

With this programme, you have all the clips that you wanted on one side and two little screens next to it and below was a timeline. We inserted the wide shot as that ran through the whole prelim and then added different shots to that. What we did was just dragged them into the timeline and then you can overlap clips and sort the script of the actors/actresses.

We both watched the wide shot which showed the whole prelim and then put in different shots in from there. We had done a close up of Luca opening the bottle so we decided to put that in because it makes it more interesting for the audience but also they can then see what it is that they are drinking and what they are actually doing. We also did over the shoulder shots.

There were a lot of mistakes made when we were editing our prelim but that was good because then we knew for next time what not to do and what not to do. At first we put the shots in the wrong order so the script wouldn't make sense. We also put the shots in so when you watched back on it they would flick from shot to shot too quickly and it looked silly and didn't flow. This looked un-professional so we changed it and you had to keep watching it and put your self in someone else shoes to make sure that you didn't think that it was boring and to make sure that it flowed.


We had to make sure that the words from the script fitted in with the editing so once we had done part of the editing we made sure that the speaking of the actors would make sense to the audience. You also had to be careful that when putting in different shots that they didn't jump to quick from shot to shot.

Once we had done a little bit of editing we would watch it to make sure that it flowed and at times we had to delete clips because they didn't look right and put new ones in either in the same place or in a different one.

We then watched it through at the end and we were really pleased with it as it was the first time that I had done something like this and I thought that it looked really good. I always wondered how they did it in films but doing it yourself you realise that it’s actually really hard and time consuming.

At the end of ours we added a sound effect of the drunken man in our prelim falling down the stairs at the end we he walked out just to emphasise the fact that he was very drunk. This also helps our knowledge on how to work Final Cut Pro.
Friday, 21 September 2012

Shooting the Prelim


Shooting the Prelim
Yesterday the 20th of September we filmed a prelim. We began by getting a storyboard which was already made up and given to us. We were split into groups and were told to each do something different but with the same scripts. We thought of setting a scene where the audience would be able to tell what we were and who we were.
In the prelim we had to make it obvious of who we were trying to make the actors look like or what era they were trying to be from.
We had to choose what theme we wanted to do and what outfits would be best suited with what we were filming. We used something very obvious, cowboy hats, as this is a very big signifier, which created meaning. We used a table, which was meant to be a bar, and we had a drink and shot glasses, which showed they were drinking and set the scene of a bar or pub.  The stereotype was obvious as the drink was on the table with people around which looked like a drinking bar and the cowboy hats to show who was drinking at the bar.


Throughout the whole prelim we did 6 shots but only moved the camera 3 times. We did different shots so that the audience could see the whole scene. We did 2 over the shoulder, one of each person, 3 close ups and 1 wide shot. We did over the shoulder so then you get the effect of the other person talking which helps create a dynamic between the character and what they are seeing. The close up was done so you could see facial expression and also close moves; it reveals the characters personality and is intimate and powerful.  We also did an extreme close up of the bottle and the shot glasses and one of the actors pouring it into the glasses which emphasised what they were drinking.
The technician, Matt, helped us how to do a basic set up of the scene and the best way to film it and then we took over. Each person in the group was given a role so everyone was involved. I was the director, which I loved because I was in charge of everything that was going on, and telling the other people in the group what to do. We had the director which was me, a camera man, two actors and one continuity. The continuity was in charge of making sure that the drink was always the right amount and that the scene was always right. This was probably the most stressful part because keeping the drink the same level was very hard.

Wednesday, 12 September 2012

180 Degree Rule

180 Degree Rule


Today we learnt about the 180 degree rule. If you break this rule then the characters will change places on the screen and the audience will not understand. This will also look really unprofessional. This is a rule in actual film making. It’s a basic guideline regarding the relationship between a character and another character or object in the scene. The axis connects the characters, which is an imaginary line. By doing this the first character will be in the frame all the time and be to the right of second character, who is then always frame left of the first. 

Tuesday, 11 September 2012

Camera lesson with Adam


Today we got filming which was exciting as this was our first time.  We got into groups, tried to remember how to set the camera up and got started. We had to try to remember what we were taught from the last lesson, like white balance for example. We then set a small scene and had to do quite a few different shots from different angles because we had to make sure that we used continuity. We set the camera up from different angles and shot. 

We worked together as a team to make the shoot affective. We focused in and made sure that the camera was clear/in focus and that the same scene was shot many times from different angles.

We Had:
    A Director
   Assistant Director
   Actor 
   Camera Man.

We watched them back to make sure that we'd managed to get all of the shots. You can really imagine them being merged together to make one scene and can understand how it will be so much more interesting for the audience to watch.
We learnt a lot from doing this and managed to see where our mistakes were and what we need to improve for next time. So this actually ended up being a very useful shoot. We now know what to do in the future which helps.
We now know what audiences want!

First Camera Lesson


On Thursday the 6th of September we learnt how to use a video camera and how to set it up. The camera which we used was the Sony NX5 which seems to be very complicated at the moment to me. We then went into the studio and we were given a tripod and video camera. We had Matt, Hurtwood House's media technician to help us through each of the steps and explain it to us.

  • The tripod is there so that when you are filming the camera is straight and that its not wonky when you shoot.
  • We were shown how to bubble it which means that the camera is all level and straight so your filming is not wonky. 
  • We also learnt how to focus which you have to do my zooming in on any object and then focusing so you can see it very clearly and then you zoom out. 
  • How to alter the heights of the tripod so you can get different angle shots which makes it more interesting for the audience to watch. 
  • How to turn the camera on and how to attach it to the tripod.

We were also told:

Most of the time the camera needs to be adjusted to the light so you have to have the camera on and make sure that it is projecting on something white, for example a white piece of paper or a white t-shirt and press a little button which will let the camera sort out it's light.
We didn't have a go at filming this lesson but we'd learnt the skills to do so so we new for future reference.

Hello

Hello, my name is Olivia Purdy and I am studying Media Studies, Business Studies and Textiles at Hurtwood House. I enjoy going to the cinema to watch the latest films that are out and I also like reading magazines and looking at the way they are layed out and that is why I had such an interest in taking Media Studies for A level.

Over the past years I have known that I wanted to do Media because it's interesting to study and it's in everyday life. As soon as we've been watching clips from films you pick up on the different camera angles and it's almost impossible not to comment on them.

We have watched the older year thrillers and they are so inspiring which makes you more determined to try to do well in Media because it's fun aswell as interesting.
I am looking forward to studying Media for the next 2 years.